Showing posts with label RECIPES-DESSERTS. Show all posts

GINGER PUMPKIN BREAD - BAKING PARTNERS

We are a group of home bakers helping each other to achieve baking perfection. Baking partners was begun by Swathi at Zesty South Indian Kitchen. In order to achieve the best results, a perfect recipe and the right techniques are required. We are a small group of home bakers, who love to bake and want to learn more about the tips and secrets of baking and baking well. We are planning to try out recipes from books/magazines and cooking shows. Every member gets a chance to present their choice of recipe and share important points with the rest of the group. The main purpose of this group is to learn the techniques, critic procedures if there are ways to improve and to eat delicious food.

This month we are baking for Fall and pumpkin is our key ingredient. We have a choice between a sweet version - GINGER PUMPKIN BREAD with a MAPLE BROWN BUTTER GLAZE or a yeasted version OF PUMPKIN BREAD from King Arthur Flour that will be used for turkey cranberry sandwiches at our house during Thanksgiving time.  I'm making both recipes, but started with the sweet version.
SWEET NON-YEAST VERSION from  SIMPLY SCRATCH BLOG
GINGER PUMPKIN BREAD & MAPLE BROWN BUTTER GLAZE
Delicious pumpkin bread smothered in a maple brown butter icing. Ginger Pumpkin Bread adapted from Martha Stewart.
Yield: 8-10                                      Prep Time: 20 minutes
Cook Time: 60-70 minutes             Total Time: 1 hour 30 minutes

12 tablespoons {1 1/2 sticks} unsalted butter, melted
2 1/2 cups all-purpose flour, plus more for pan
2 teaspoons baking powder
2 teaspoons ground ginger
1 teaspoon salt
1 cup granulated sugar
1 cup packed light-brown sugar
1 can (15 ounces) pumpkin puree (1 3/4 cups)
3 large eggs
**2/3 cup golden raisins
**1/2 cup chopped walnuts
**these were my additions and we loved them!!!
  • Preheat oven to 375 degrees.
  • In a 8x5 loaf pan; lightly butter or spray with baking spray and then dust wit flour (tap out any excess flour and discard), set aside.
  • In a medium bowl, whisk together flour, baking powder, ginger, and salt.
  • In a large bowl, whisk together sugars, pumpkin, melted butter, and eggs. Next add in the flour mixture, and stir until just combined.
  • Pour batter into the prepared pan. Bake until a cake tester is inserted into the center and comes out with only a smidgen coating it, which is about 60 to 70 minutes.
  • Let cool 10 minutes; invert pan and transfer the loaf to a wire rack to cool completely.
FOR THE GLAZE:
1/4 cup Real Maple Syrup
1/4 teaspoon Real Vanilla Extract
2 tablespoons Unsalted Butter
1/3 cup Powdered Sugar, plus more if needed
1 tablespoon Heavy Cream
A pinch of Kosher Salt


  • Heat a small skillet over medium/medium-high heat.
  • Once the pan is hot, add in the two tablespoons of unsalted butter. The butter should instantly start to melt and turn golden.
  • Once melted and a deep golden, turn off the heat and add in the maple syrup and vanilla, whisking constantly {it should bubble up}.
  • Once the bubbles have subsided a bit, whisk in the powdered sugar.
  • Keep whisking while adding the tablespoon of heavy creamy and a pinch of kosher salt.
  • Drizzle warm icing over cooled cake. Slice and serve!
Though pumpkin is available in cans all year long, I seem to associate this bread with autumn. It makes marvelous turkey sandwiches spread with cranberry sauce. Because of the golden color, it also makes especially festive dinner rolls for the holiday table.You can make half the dough into rolls, and the other half into loaves for sandwiches.
PUMPKIN YEAST BREAD
1/2 cup warm water

2 packages (2 tablespoons) active dry yeast

2/3 cup warm milk

2 large eggs, beaten

1 1/2 cups puréed pumpkin, either fresh or canned

2 tablespoons vegetable oil

6 1/2 cups (approximately) King Arthur Unbleached All-Purpose Flour

1/2 cup brown sugar

2 teaspoons salt

1/2 teaspoon ground ginger

1/2 teaspoon ground cardamom
  • In a large bowl, stir yeast into water to soften. Add milk, eggs, pumpkin, oil, 4 cups flour, brown sugar, salt, ginger and cardamom to yeast mixture. Beat vigorously for 2 minutes.
  • Gradually add remaining flour, a little at a time, until you have a dough stiff enough to knead. Turn dough out onto a floured surface. Knead, adding flour as necessary, until you have a smooth, elastic dough.
  • Put dough into an oiled bowl. Turn once to coat entire ball of dough with oil. Cover with a towel and let rise until doubled, about 1 hour.
  • Turn dough out onto a lightly oiled work surface. Divide dough in half. Shape dough into loaves and place in well-greased 10 x 5-inch pans or, shape half into a loaf, and other half into 12 large dinner rolls. Cover with a towel and let rise until almost doubled, about 45 minutes.
  • Bake in a preheated 375°F oven. Loaves bake about 30 minutes, rolls about 20. Check the internal temperature of each with an instant-read thermometer; a reading of 190°F means bread or rolls are done.
  • Immediately remove bread or rolls from pans and cool on a wire rack to prevent crust from becoming soggy. For a shiny crust, brush tops of bread or rolls lightly with vegetable oil. Makes 2 large loaves, or 1 large loaf and 12 dinner rolls.
This recipe reprinted from The Baking Sheet Newsletter, Vol. III, No. 1, November 1991 issue. 

I added a slight blend of cinnamon, nutmeg and cloves to create a marbleing.   It made a little heavier bread and slightly sweet, but was very delicious.

PINK LEMONADE CHEESECAKE

PINK LEMONADE CHEESECAKE
LEMON COOKIE CRUST
20 yellow Oreo cookies
4 tablespoons butter, melted
  • Using a food processor grind cookies until crumbs.
  • Add melted butter and process until well blended.
  • Press crumb mixture into the bottom of a greased 9-inch springform pan and set aside.
LEMONADE FILLING
24 ounces cream cheese
3/4 cup sugar
5 teaspoons cornstarch
4 eggs + 1 egg yolk
3/4 cup frozen pink lemonade concentrate, thawed
2 teaspoons vanilla extract
2 drops red food coloring
  • Preheat oven to 350°.
  • In a large mixing bowl combine the cream cheese, sugar and cornstarch beating until smooth.
  • Add eggs and egg yolk, one at a time, beating well after each addition.
  • Add the lemonade, vanilla and red food coloring.
  • Pour over crust.
  • Bake for 15 minutes.
  • Reduce heat to 200° and bake for 70 minutes or until center is set and is no longer shiny.
  • Remove from oven and run a knife along the inside edge of the pan.
  • Turn the oven off.
  • Return cake to oven for 1 more hour.
  • Chill, uncovered, overnight.

LEMONADE GLAZE
1/3 cup frozen pink lemonade concentrate, thawed
Juice of 1 LARGE lemon
1 tablespoon cornstarch
1 drop red food coloring
lemon slices for garnish
  • In a small saucepan, whisk together the lemonade, lemon juice, food coloring and cornstarch over a medium high heat until well blended.
  • Stir constantly until thickened and bubbly.
  • Turn off heat and stir for a few minutes more.
  • Pour over cheesecake.
  • Garnish with lemon.
  • Chill until ready to serve.

PEACH ICE CREAM PIE aka WILLIE NELSON'S COUNTRY PEACH COBBLER PIE

I talked to my niece this morning and she was telling me about this amazing dessert that she had at a local restaurant last Valentine's Day. Let's just say it involved Oreos, chocolate, Ben & Jerry's Cherry Garcia and some whip cream.  The more she talked the more I wanted some.  So, when I went to the grocery store today I decided to pick up the ingredients.  Guess what? They didn't have any Cherry Garcia, but they did have my new favorite Willie Nelson's Country Peach Cobbler. So I'm altering the ingredients a bit and we'll call it the summer version.  This will easily serve 4.

1 pint Ben & Jerry's Willie Nelson's Country Peach Cobbler ice cream, softened**
1 row of golden double stuff oreos
hot fudge
caramel sauce
  • Crush the oreos in a food grinder until small sand like consistency.
  • Press oreo mixture into the bottom of a 6 inch baking dish.
  • Press ice cream into crust and spread smooth.
  • Chill in freezer for 2 hours.
  • Top with caramel and/or one of these hot fudge toppings.
CARAMEL

6 tablespoons light corn syrup

1/2 cup + 2 tablespoons sugar

3 tablespoons unsalted butter, cubed

1/2 cup heavy cream

1/2 teaspoon sea salt 
  • In a heavy saucepan heat the corn syrup.
  • Stir in the sugar until well incorporated and cook over a moderately high heat, undisturbed until a deep amber caramel forms.
  • Turn off heat and carefully stir in butter with a long spoon.  Careful, it will spit.
  • Add the heavy cream in a thin stream, stirring constantly until smooth.
  • Add salt and blend well.
  • Transfer the caramel to a heatproof container and allow to cool.
To serve:

  • Heat caramel in small increments until desired temperature.
MOCHA HOT FUDGE SAUCE1/3 cup warm water
1/4 cup light corn syrup
scant 1/3 cup unsweetened cocoa powder
2 tablespoons sugar
4 oz. bittersweet chocolate, melted & cooled
3 tablespoons strong brewed coffee
2 tablespoons golden rum

  • In a medium saucepan blend together the water, corn syrup dissolving the sugar and cocoa into it until smooth.
  • Bring to a low boil.
  • Remove from heat and whisk in the chocolate until smooth.
  • Gradually add the coffee and rum until desired flavor and consistency is reached.
  • Serve warm.
  • Makes 1 1/2 cups. Refrigerate for up to 2 weeks.
  • Microwave20-30 seconds to soften refrigerated caramel before serving.
MILKY WAY FUDGE TOPPING
12 ounces Milky Way candy bars, cut into chunks
6 ounces semi-sweet chocolate
1 cup milk

  • In a double boiler combine candy bars, chocolate and milk.
  • Cook and stir constantly until melted and well blended and smooth.
  • Store in a airtight jar in the refrigerator.
 **or change it out to your favorite flavor ice cream.

SALTED CARAMEL CHEESECAKE CUPS

Every recipe we tried recently was excellent, but this dessert was melt-in-your-mouth decadently good!  It was also rich so I'm very glad I made it in these small ramekins for individual servings!
SALTED CARAMEL CHEESECAKE CUPS

CHEESECAKE
1/2 pound softened cream cheese
1/2 cup sugar
2 JUMBO eggs at room temperature
1/2 cup sour cream

CARAMEL
6 tablespoons light corn syrup
1/2 cup + 2 tablespoons sugar
3 tablespoons unsalted butter, cubed
1/2 cup heavy cream
1/2 teaspoon sea salt
  • Preheat oven to 325°.
  • In a large mixing bowl beat the cream cheese and sugar at medium speed until smooth.
  • Add eggs, beating until incorporated after each egg.
  • Beat in sour cream.
  • Pour into ramekins.
  • Set ramekins in a baking dish and add water to midway up the ramekins.
  • Place in the center of the oven and bake 15-20 minutes until the edges are set, but the centers are still jiggly.
  • Turn off oven and leave cheesecakes undisturbed for 1 hour.
  •  After 1 hour transfer ramekins to cooling rack and cool completely before covering.
  • Cover and chill cheesecakes in the refrigerator at least several hours, preferably overnight.
  • Meanwhile make the caramel.
  • In a heavy saucepan heat the corn syrup.
  • Stir in the sugar until well incorporated and cook over a moderately high heat, undisturbed until a deep amber caramel forms.
  • Turn off heat and carefully stir in butter with a long spoon.  Careful, it will spit.
  • Add the heavy cream in a thin stream, stirring constantly until smooth.
  • Add salt and blend well.
  • Transfer the caramel to a heatproof container and allow to cool.
To serve:
  • Heat caramel in small increments until desired temperature.
  • Pour a spoonful over each cheesecake and serve.

BAKING PARTNERS - CHALLENGE #13 - LEMON CHIFFON CAKE


It's our birthday! Our group is turning 1 year old. 
Happy Birthday BAKING PARTNERS!!!!

Chiffon cakes are foamy and airy cakes in texture and combine the richness of a butter cake with lightness of a sponge cake. They are leavened primarily with beaten egg whites, just like Angel foot cakes are. In fact, they are very similar in appearance to angel food cakes and are usually baked in the same type of tube pan. Chiffon cakes, unlike angel food cakes, contain both egg yolks and vegetable oil. These two ingredients keep the cake moist, soft and tender and result in a cake that tastes great and keeps well.  Even refrigerated, the oil in the cake remains soft and makes it much more tender and contain less sugar than an Angel food cake. 

The chiffon cake was created by Harry Baker, a Los Angeles insurance agent, in 1927.  Baker carefully guarded his secret technique for almost two decades, only selling his cakes to celebrities and the famous Brown Derby restaurant. The popularity of his cakes grew quickly, and he eventually sold the recipe to General Mills in 1947. 

Now, Mr. Baker had two big secrets with his chiffon cake recipe. The first is that chiffon cakes use oil instead of butter, which aides in the airy quality of the cake. It is also nice because the cake can be refrigerated without firming up. The second secret of the chiffon cake is to whip the egg whites separately from the yolks and to fold them ever so gently into the batter.  If done correctly, the results are divine. If not, you can end up with an oozy-gooey mess in your pans.

Saraswathi of Sara’s kitchen suggested this Lemon Glow Chiffon cake.


Prep time: 30 minutes
Baking time: 50 to 55 minutes
Makes: 1 ungreased two piece 10 inch tube pan OR can be halved and baked in 9 inch tube pan or 10 inch round cake pan or 8 inch round cake pan + 6 inch cake pan.
Adapted from The Cake Bible by Rose Levy Beranbaum

Dry Ingredients
2 1/4 cups (8 ounces) cake flour
1 1/2 cups + 2 tablespoons sugar
1/2 teaspoons salt
1/2 teaspoons baking soda
1 ~ 2 tablespoons lemon zest

Wet Ingredients
½ cup canola oil or sunflower oil
3 large egg yolks
2/3 cup water @ room temperature
2 tablespoons lemon juice
1 teaspoon Vanilla essence

For Meringue
1 ¼ teaspoon cream of tartar
2 tablespoons sugar
7 large egg whites
  • Preheat your oven to 325 degrees.
  • Use a 10-inch tube pan with a detachable bottom, but do not grease it as the batter needs to climb up the sides OR line two 9 inch baking pan with wax paper and do not grease the pan. Place a ramekin in middle of the pan.
  • In a large mixing bowl, combine 1 1/2 cups of the sugar and the lemon zest. 
  • With your fingertips, work the zest and sugar together until the sugar is grainy and very aromatic.  
  • Add the cake flour, baking soda and salt to the bowl.
  • If using a stand mixer, use the beater attachment and beat on low until the ingredients are well incorporated. You can also do this by hand with a whisk.
  • Make a well in the center of the ingredients and add the oil, egg yolks, water, lemon juice and vanilla.   
  • Mix for about one minute on medium speed until the batter is smooth and there are no lumps.
  • In a second large mixing bowl, beat the egg whites until they are foamy. 
  • Add the cream of tartar and continue to beat on medium speed until they reach soft peak stage. You will know your egg whites have reached this stage when the beaters start to leave a trail or when the peaks fall over when the beaters are raised. 
  • Add the remaining 2 tablespoons of sugar, and continue to beat the egg whites until they form stiff peaks when the beaters are raised.
  • Using a slotted spoon or balloon whisk, add 1/3 of  egg whites to your cake batter and gently stir them until they are incorporated. 
  • Add the remaining egg whites to the batter and very gently fold them into the batter until they are incorporated and no traces of egg whites remain.
  • Pour the batter into the ungreased pan and run a small metal spatula or knife through the batter to prevent air pockets. 
  • Bake for 50 to 55 minutes  or until the cake bounces back when lightly pressed in the center.  
  • Once cooked, take the cake out of the oven and immediately turn it upside down over a bottle* or similar to it  until it is completely  cool, which can take up to 90 minutes.
  • Using an up and down motion, use a palette knife to loosen the sides of the cake away from the tin. 
  • Pull out the cake and use the palette knife around the bottom of the cake to release it from the base. 
  • Turn it over so that the base becomes the top (I didn't because I like the rustic look of my funky pan) and sprinkle with a dusting of icing sugar to serve. I used a bourbon lemon glaze.
Cake will stay fresh for 3 days in room temperature, 10 days refrigerated or  2 months frozen.

BAKING PARTNERS - CHALLENGE #12 - ECLAIRS

Baking Partners collage button
We are a group of home bakers helping each other to achieve baking perfection. Baking partners was begun by Swathi at Zesty South Indian Kitchen. In order to achieve the best results, a perfect recipe and the right techniques are required. We are a small group of home bakers, who love to bake and want to learn more about the tips and secrets of baking and baking well. We are planning to try out recipes from books/magazines and cooking shows. Every member gets a chance to present their choice of recipe and share important points with the rest of the group. The main purpose of this group is to learn the techniques, critic procedures if there are ways to improve and to eat delicious food.
This month is an awesome choice of Chocolate eclairs!
Baking Partners #11
Chocolate Eclairs and French laundry Gougeres This month baking partner’s challenge we are going to learn, Pate a choux pastry, a French pastry, which is used in sweet and savory items. The recipe came from Thomas Keller’s Bouchon Bakery book. I have to admit my first batch turned out wrong, but it was all my fault working too fast. Batch #2 was delicious and perfect. There is also a recipe of chocolate éclairs recipe from Food network’s Alton brown.
Please try to make both recipes if not at least one. If you don’t know what pate a choux is, here is the link you can read about it. We were asked to stick to the recipe as much as possible. You can see step to step tutorial of gougeres making from this link.

Choux Pastry Bouchon Bakery for Éclairs – Makes 15 large Éclairs
Pate a choux for Eclairs
1 ¼ cups All purpose flour
2 tablespoons+ 2 teaspoons Sugar
1 cup Water
4.2 ounces Unsalted butter at room temperature
¾ + 1/8 teaspoon Kosher salt
4 Eggs (use one more if needed)
  • Get your kitchen aid stand mixer ready with the paddle tool, if you don’t have kitchen aid use your hand mixer.
  • Sift the flour and mix with the sugar, set aside.
  • Combine water, butter and salt n a medium sauce pan. Place it over medium low heat and stir until butter is melted.
  • When butter is melted turn the heat up and bring it to a simmer, then remove from heat.
  • Add the flour/sugar mix and stir until well combined and the mixture has a paste like consistency.
  • Then place over medium heat and stir rapidly until the dough pulls away from the sides and the bottom of the pan is clean.
  • Immediately transfer the dough to the mixer bowl and mix on low for 1 min to release little of the steam and heat.
  • Start adding the eggs, one at a time, beating until every egg is completely absorbed
  • After all the eggs are added, beat on medium for 2 min.
  • When the paddle is lifted the dough should form a bird’s beak – It should hold its shape and turn down over itself.
  • Transfer the dough to a pastry bag and chill until completely cold.
  • Preheat the oven to 375°.
  • Make a piping template by drawing six 15 cm/6 inch lines, 5 cm apart on parchment paper. Then place the template under the parchment paper you will pipe on.
  • With a large star tip pipe the éclairs, following the lines on the template.
  • When the pastry is reaching its 15 cm/6inch, begin to lessen the pressure, and then stop it as you bring the dough back over itself, leaving a little curl at the end.
  • Wet your finger and gently press down the tip of the curls.
  • Spray the éclairs lightly with water.
  • Place in the hot oven and immediately turn the heat down to350°.
  • Bake for 40 min, rotating the pan half way through.
  • Lower the temp to 325° and bake for additional 20 min.
  • Lower the temperature to 300° and bake for 10 more minutes.
  • Your puffs should now be light brown, light and hollow.
Chocolate pastry cream
5.8 ounces 70% chocolate chopped
.8 ounce 100% unsweetened chocolate chopped
2 tablespoon + 2 teaspoon
Custard powder or all purpose flour
1/4cup + 1 tablespoon Unsweetened cocoa powder
2 Egg yolks (1/4cup) 1/4 cup+ 3 tablespoons sugar
1.8 ounces Unsalted butter at room temperature
  • Melt two chocolate together in double boiler and set aside
  • Combine the custard powder or all purpose flour and cocoa powder in a small bowl.
  • In a bowl add some ice and water and set aside. This is our ice bath.
  • Whisk in egg yolks and sugar by gradually adding sugar and to this add custard powder or flour mixtures then add milk and combined very well.
  • Heat the above egg-sugar-flours-milk mixture over medium heat until it begins to thicken with constant string.
  • Pour the pastry cream over the strainer and pressing gently to push the thickened cream through. Whisk for about 1 minute to cool. Then add butter in 2 additions and mix in well. Then add melted chocolate and mix in very well until everything is combined well.
  • Transfer to air tight container and line with plastic wrap on the top to prevent the film from forming, refrigerate for at least 1 hour and you can keep this chocolate cream for about 4 days.
  • When you are ready to use the cream transfer to bowl and stir gently until it has creamy consistency.
Instead of chocolate pastry cream you can also use orange custard. I chose the orange to help make the flavor more delicate and then topped them with a chocolate glaze.

Orange Custard
1 1/4 cups Whole milk
1 tablespoon Orange zest (from about 2 oranges)
3 Egg Yolks 1/4 cup Sugar
1 tablespoon flour
2.5 tbs cornstarch
1 tablespoon Grand Mariner (optional)
  • In a small saucepan, warm the milk and orange zest over low heat until it is just hot enough to steam.
  • While the milk is warming, whisk together the egg yolks, sugar, flour, and cornstarch until the mixture is completely smooth.
  • Temper the eggs by adding a little bit of the warm milk and whisk constantly. Add little at a time until you have added half of the milk.
  • Then pour the eggs/milk mix into the pan with the remaining hot milk.
  • Heat it over medium heat and stir constantly until the mixture reaches 170° and is very thick.
  • Remove from heat and stir in Grand Mariner.
  • Chill before piping into the Éclairs.
How to fill the Éclairs
  • Use a 0.4-0.6 cm plane tip.
  • Poke 2 holes, 1/2 inch from each end, into the bottom of each éclair. (I made mini ones-about 2 inches long) so only poked from one end to fill them)
  • Fill a pastry bag with custard of your choice.
  • Place the tip of the pastry bag into one of the holes and begin filling the éclair.
  • Pipe cream as needed into the second hole or until the éclair feels heavy.
  • You should use 1/4 cup of cream.

CARROT CUPCAKES with CARAMEL CREAM CHEESE FROSTING

Carrot Cupcakes
CARROT CUPCAKES with CARAMEL CREAM CHEESE FROSTING
Makes 24 cupcakes
CUPCAKES
4 cups shredded carrots (about 1 1/4 pounds)
1 cup golden raisins
1 cup walnuts, finely chopped
2 cups flour
2 teaspoons cinnamon
2 teaspoons baking powder
1/2 teaspoon baking soda
1 teaspoon salt
1 1/4 cup canola oil
2 cups sugar
4 Large eggs, room temperature
1 teaspoon PURE vanilla
1 teaspoon maple extract
  • Preheat oven to 325 degrees.
  • Line muffin tins with paper liners.
  • In a medium mixing bowl sift together the flour, cinnamon, baking powder, baking soda, salt and walnuts.
  • In a large mixing bowl beat together the oil and sugar until well blended.
  • Add eggs, one at a time, blending to incorporate.
  • Add vanilla and maple extracts.
  • Gradually flour mixture until well blended and smooth.
  • Alternately fold in carrots and raisins.
  • Fill liners 3/4 full.
  • Bake 25 minutes until toothpick inserted comes out clean.
  • Cool completely on a wire rack.
ICING
1/2 cup sugar
2 tablespoons water
1/4 teaspoon lemon juice
1/4 cup heavy cream
1 pound cream cheese, softened
2 sticks butter, softened
1/2 cup powdered sugar
1 teaspoon PURE vanilla
1 teaspoon maple extract
  • In a small deep saucepan combine the sugar, lemon juice and water.
  • Bring to a simmer over a medium high heat without stirring until the edges begin to color, about 5 minutes.
  • Gently swirl the pan and continue to simmer until the color turns amber, about 2 minutes more.
  • Remove from heat.
  • Using a wooden spoon, stir in heavy cream.
  • Transfer to a small bowl and allow to cool.
  • In a medium mixing bowl beat together the butter and cream cheese.
  • Add the powdered sugar and beat until smooth.
  • Add vanilla and maple extracts until incorporated.
  • Blend in caramel mixture.
  • Ice cupcakes.***
***For a more decorative cupcake DO NOT blend in caramel mixture with cream cheese. Instead, thinly ice each cupcake and then pipe a ring around each cupcake top. Spoon some caramel mixture into each ring.
hubby approved 2 
Tasty Tuesday is hosted by Jen over at Balancing Beauty and Bedlam.
Tempt my Tummy Tuesday hosted by Lisa at Blessed with Grace.
Cooking Thursday is hosted by Sandra over at Diary of a Stay at Home Mom.

UPSIDE DOWN APPLE PIE & TOURTIERE du SHACK aka PORK POT PIE- BAKING PARTNERS #6

We are a group of home bakers helping each other to achieve baking perfection.  Baking partners was begun by Swathi at Zesty South Indian Kitchen.   In order to achieve the best results, a perfect recipe and the right techniques are required.  We are a small group of home bakers, who love to bake and want to learn more about the tips and secrets of baking and baking well.  We are planning to try out recipes from books/magazines and cooking shows.  Every member gets a chance to present their choice of recipe and share important points with the rest of the group. The main purpose of this group is to learn the techniques, critic procedures if there are ways to improve and to eat delicious food.  

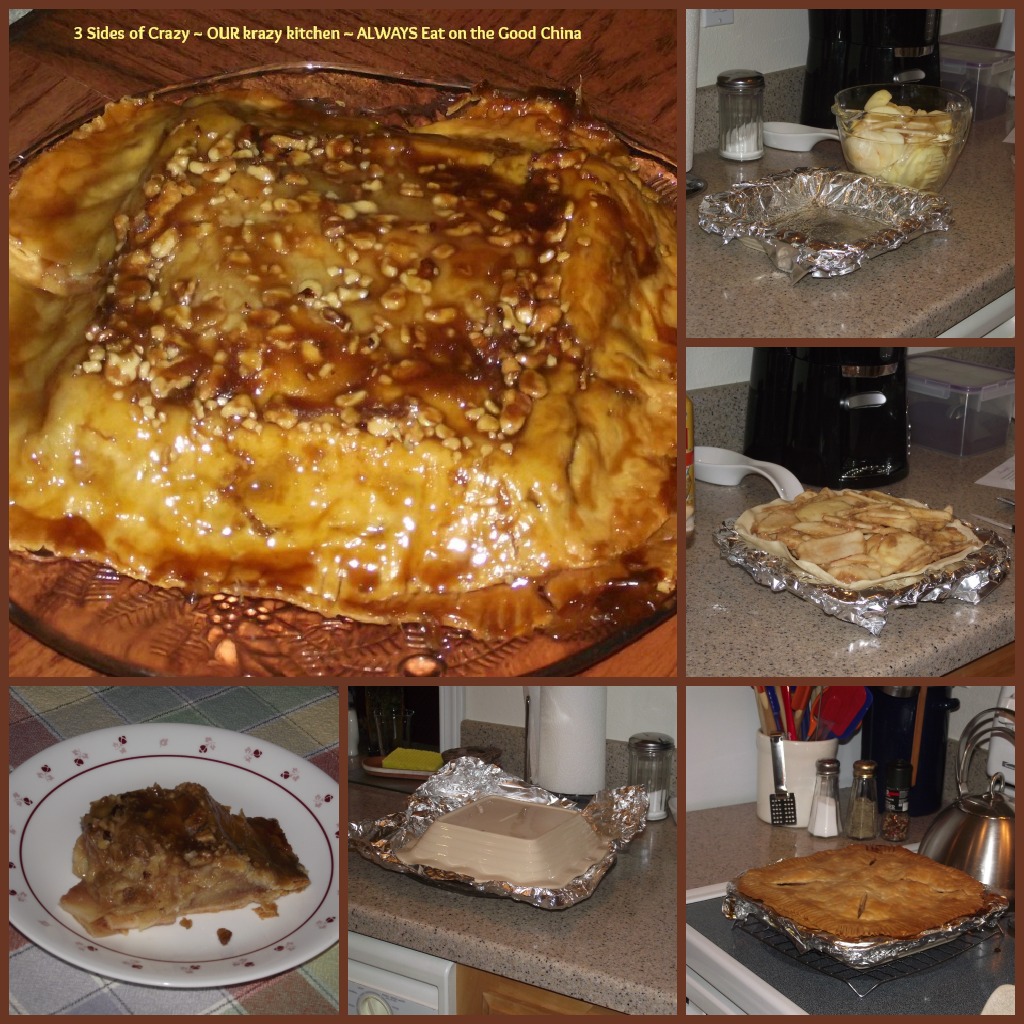
This month we had 3 choices and I found the time to make 2 of them.  I also got to pick one that I'd been dying to make, Upside Down Apple Pie.  We LOVED it!! The one thing I am going to do different next time is make them all individual pies - more crust and gooey wonderfulness that way.
UPSIDE DOWN APPLE PIE Yield: 8 servings.
original recipe from Taste of Home

CRUST:
2 cups all-purpose flour
1/2 teaspoon salt
6 tablespoons shortening (Crisco stick)
2 tablespoons cold butter
5 to 7 tablespoons orange juice

FILLING:
6 tablespoons butter, melted, divided
1/2 cup packed brown sugar
1/2 cup chopped pecans (or walnuts)
1 cup Imperial Sugar
1/3 cup all-purpose flour (sifted)
1/2 teaspoon rum extract (optional)
1/2 teaspoon maple extract (optional)
1 teaspoon ground cinnamon
1/4 teaspoon ground nutmeg
8 cups thinly sliced peeled tart apples (I like honey crisp or Granny Smith) (about 1/8-inch thick)

GLAZE:
1/2 cup confectioners' sugar
2 to 3 teaspoons orange juice
  • In a large bowl, combine flour and salt; cut in shortening and butter until crumbly.
  • Gradually add orange juice, tossing with a fork until dough forms a ball.
  • Divide dough into two balls. Wrap in plastic wrap; refrigerate for at least 30 minutes.
  • Line a 9-in. deep-dish pie plate with heavy-duty foil, leaving 1-1/2 in. beyond edge; coat the foil with cooking spray.
  • Combine 4 tablespoons butter, brown sugar and nuts; spoon into prepared pie plate.
  • In a large bowl, combine the apples, sugar, flour, cinnamon, nutmeg and remaining butter; toss gently.
  • On waxed paper, roll out one ball of pastry to fit pie plate.
  • Place pastry over nut mixture, pressing firmly against mixture and sides of plate; trim to 1 in. beyond plate edge.
  • Fill with apple mixture.
  • Roll out remaining pastry to fit top of pie; place over filling. Trim to 1/4 in. beyond plate edge.
  • Fold bottom pastry over top pastry; seal and flute edges. Cut four 1-in. slits in top pastry.
  • Bake at 375° for 50-55 minutes or until apples are tender and crust is golden brown (cover edges with foil during the last 20 minutes to prevent over browning).
  • Cool for 15 minutes on a wire rack. Invert onto a serving platter; carefully remove foil. Combine glaze ingredients; drizzle over pie. 
TOURTIERE du SHACK aka PORK POT PIE
note: I made these as individual pies and they were a HUGE hit.  I also made a few changes based on what I had on hand or available locally.  One of my changes was to hide the mushrooms from hubby.  He swears he hates cooked mushrooms, but I've gotten quite crafty at disguises them visibly while keeping their flavor.

adapted from http://www.bonappetit.com/recipes/2012/01/tourtiere-du-shack

Crust

  • 3 1/3 cups all-purpose flour
  • 2 cups (4 sticks) chilled unsalted butter, cut into 1/2" cubes
  • 1 teaspoon kosher salt

Filling

  • 1 1/2 cups low-salt chicken broth
  • 1 1/2 medium onions, chopped, divided I used 1 large onion
  • 4 garlic cloves, chopped, divided
  • 5 whole black peppercorns plus freshly ground black pepper I used Indonesian White pepper
  • 5 sprigs thyme I used Penzeys French thyme, 1 teaspoon
  • 2 bay leaves I omitted
  • 1 1/2 pounds boneless pork shoulder (Boston butt), cut into 2" pieces
  • Kosher salt I used Himalayan Pink Sea Salt
  • 1 tablespoon unsalted butter
  • 8 medium button mushrooms, stemmed and finely chopped I used Marx Foods dehydrated Chanterelle rehydrated in the white wine
  • I added a celery stalk, sliced and
  • I added a large carrot, sliced to disguise the mushrooms from hubby
  • 1/2 cup dry white wine I used Savignon Blanc
  • 1 1/4 pounds ground pork
  • 1/8 teaspoon cinnamon
  • 1/8 teaspoon ground cloves
  • 3/4 cup grated, peeled russet potato I used Yukon Gold
  • All-purpose flour (for surface)
  • 1 large egg yolk, beaten to blend

SPECIAL EQUIPMENT:

  • A 9"-diameter deep-dish glass or ceramic pie dish
  • Directions:

Crust

  • Pulse flour, butter, and salt in a food processor until pea-size pieces of butter form. Transfer to a medium bowl. Add 1/4 cup ice water and stir just until shaggy clumps form, adding more water by teaspoonfuls if dry. Divide dough in half; flatten each half into a disk. Wrap disks in plastic wrap and chill for at least 2 hours. DO AHEAD:Dough can be made 2 days ahead. Keep chilled.

Filling

  • Preheat oven to 325°. Combine broth, 1/2 chopped onion, 1 chopped garlic clove, whole peppercorns, thyme, and bay leaves in a medium pot. Add pork shoulder; season with salt and pepper. Bring to a simmer over medium heat.
  • Cover pot. Transfer to oven; braise until pork shoulder is tender and shreds easily, about 2 hours. Remove from oven; let cool.
  • Transfer pork shoulder to a work surface. Shred meat with your fingers and transfer to a medium bowl. Strain pan juices through a fine-mesh sieve; add 1/2 cup juices to pork; discard solids in strainer.
  • Melt butter in a large skillet over medium heat. Add remaining 1 chopped onion and 3 chopped garlic cloves; cook, stirring often, until soft, 5–7 minutes. Add mushrooms; cook, stirring often, until almost all liquid is evaporated, 5–7 minutes. Add wine; stir, scraping up browned bits. Bring to a boil; cook, stirring often, until liquid is almost evaporated, about 5 minutes.
  • Add ground pork, cinnamon, and cloves. Cook, stirring to break up into small pieces, until pork is cooked through, about 5 minutes. Add potato. Cook until potato is soft, about 10 minutes. Remove from heat. Stir in shredded pork with juices. Season to taste with salt and pepper; let cool slightly. Chill until cold, about 1 hour.DO AHEAD: Can be made 1 day ahead. Cover and keep chilled.
  • Roll out 1 dough disk on a lightly floured surface into a 12" round. Transfer to pie dish, leaving overhang. Fill with cooled meat mixture. Roll out remaining dough disk into a 10" round. Place dough over meat filling. Fold overhang over top crust and crimp edges. Brush crust with egg yolk. Cut three 2" slits in top crust. Chill for 1 hour.
  • Preheat oven to 400°. Bake tourtiere for 30 minutes. Reduce heat to 350°; bake until crust is golden brown and filling is bubbling, 40–50 minutes. Let cool for 20 minutes before serving.